Set up Reverse ETL
There are four components to Reverse ETL: Sources, Models, Destinations, and Mappings.
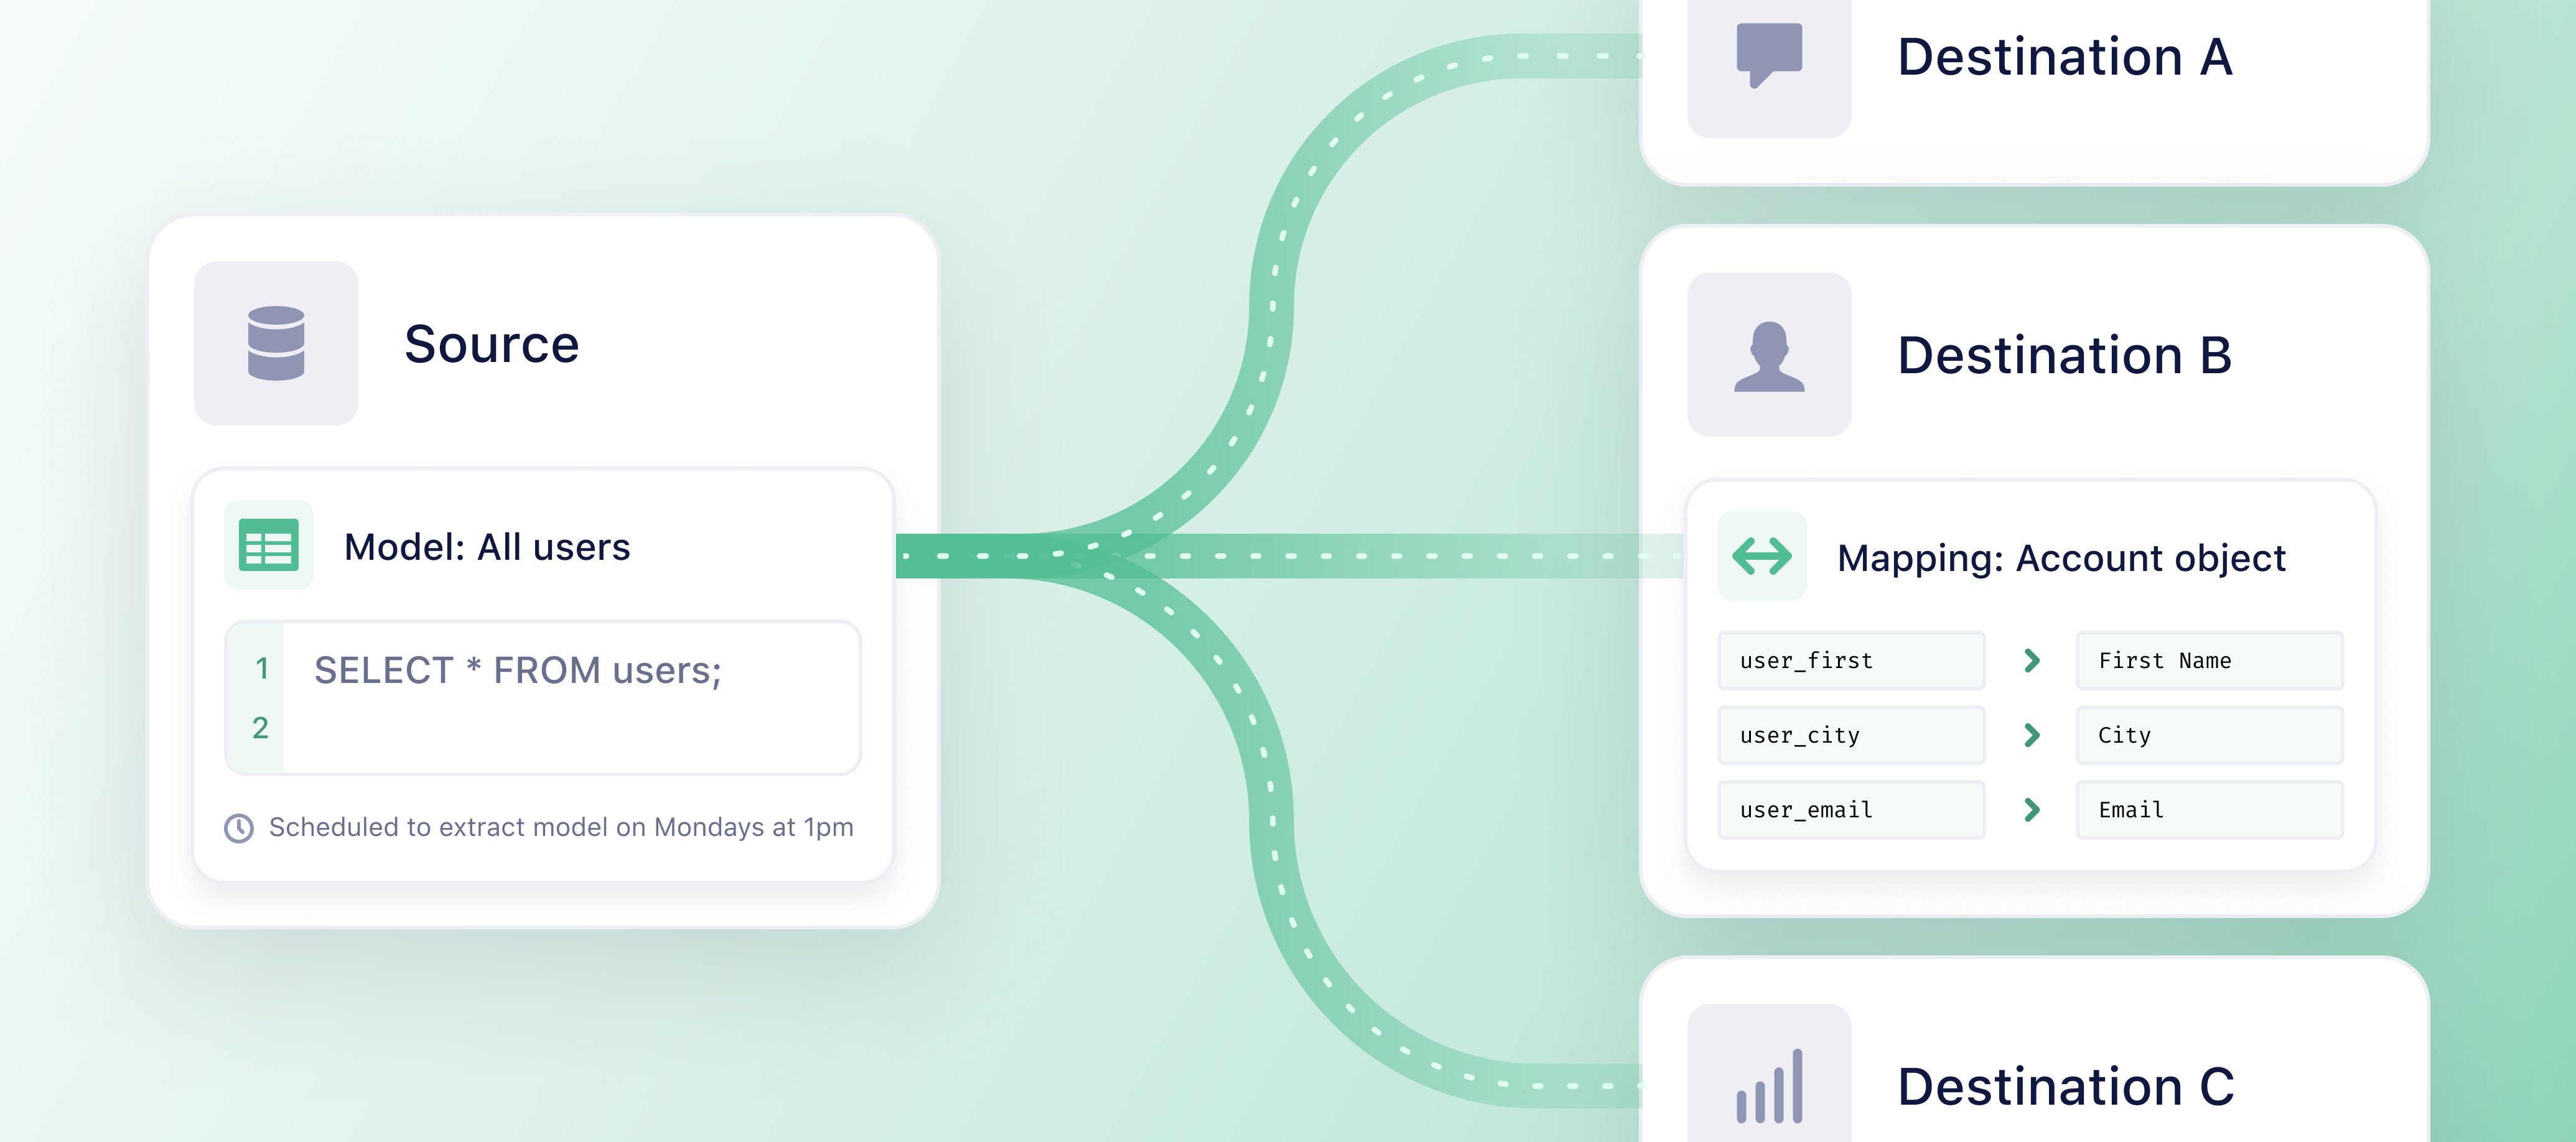
Follow these 4 steps to set up Reverse ETL:
Step 1: Add a source
A source is where your data originates from. Traditionally in Segment, a source is a website, server library, mobile SDK, or cloud application which can send data into Segment. In Reverse ETL, your data warehouse is the source.
You need to be a user that has both read and write access to the warehouse.
To add your warehouse as a source:
- Navigate to Connections > Sources and select the Reverse ETL tab in the Segment app.
- Click + Add Reverse ETL source.
- Select the source you want to add.
- Follow the corresponding setup guide for your Reverse ETL source:
After you add your data warehouse as a source, you can add a model to your source.
Step 2: Add a model
Models are SQL queries that define sets of data you want to synchronize to your Reverse ETL destinations. After you add your source, you can add a model.
Use Segment's dbt extension to centralize model management and versioning
Users who set up a BigQuery, Databricks, Postgres, Redshift, or Snowflake source can use Segment’s dbt extension to centralize model management and versioning, reduce redundancies, and run CI checks to prevent breaking changes.
Extensions is currently in public beta and is governed by Segment’s First Access and Beta Preview Terms. During Public Beta, Extensions is available for Team and Developer plans only. Reach out to Segment if you’re on a Business Tier plan and would like to participate in the Public Beta.
To add your first model:
- Navigate to Connections > Sources and select the Reverse ETL tab. Select your source and click Add Model.
- Click SQL Editor as your modeling method. (Segment will add more modeling methods in the future.)
- Enter the SQL query that’ll define your model. Your model is used to map data to your Reverse ETL destinations.
- Choose a column to use as the unique identifier for each record in the Unique Identifier column field.
- The Unique Identifier should be a column with unique values per record to ensure checkpointing works as expected. It can potentially be a primary key. This column is used to detect new, updated, and deleted records.
- Click Preview to see a preview of the results of your SQL query. The data from the preview is extracted from the first 10 records of your warehouse.
- Segment caches preview queries and result sets in the UI, and stores the preview cache at the source level.
- Click Next.
- Enter your Model Name.
- Click Create Model.
To add multiple models to your source, repeat steps 1-8 above.
Edit your model
To edit your model:
- Navigate to Connections > Destinations and select the Reverse ETL tab.
- Select the source and the model you want to edit.
- On the overview tab, click Edit to edit your query.
- Click the Settings tab to edit the model name or change the schedule settings.
Step 3: Add a destination
Once you’ve added a model, you need to add a destination. In Reverse ETL, destinations are the business tools or apps you use that Segment syncs the data from your warehouse to.
Reverse ETL supports the destinations in the Reverse ETL catalog. If the destination you want to send data to is not listed in the Reverse ETL catalog, use the Segment Connections Destination to send data from your Reverse ETL warehouse to your destination.
Engage users can use the Segment Profiles Destination to create and update Profiles that can then be accessed through Profile API and activated within Twilio Engage.
Separate endpoints and credentials required to set up third party destinations
Before you begin setting up your destinations, note that each destination has different authentication requirements. See the documentation for your intended destination for more details.
To add your first destination:
- Navigate to Connections > Destinations and select the Reverse ETL tab.
- Click Add Reverse ETL destination.
- Select the destination you want to connect to and click Configure.
- Select the Reverse ETL source you want to connect the destination to.
- Enter the Destination name and click Create Destination.
- Enter the required information on the Settings tab of the destination.
- Navigate to the destination settings tab and enable the destination. If the destination is disabled, then Segment won’t be able to start a sync.
Step 4: Create mappings
After you’ve added a destination, you can create mappings from your warehouse to the destination. Mappings enable you to map the data you extract from your warehouse to the fields in your destination.
To create a mapping:
- Navigate to Connections > Destinations and select the Reverse ETL tab.
- Select the destination that you want to create a mapping for.
- Click Add Mapping.
- Select the model to sync from.
- Select the Action you want to sync and click Next.
- Actions determine the information sent to the destination. The list of Actions will be unique to each destination.
- Add the mapping’s name. The initial name will default to the Action’s name (for example, ‘Track Event’) but is completely customizable. It will allow you to identify the mapping amongst others.
- In the Select record to map and send section, select which records to send to your destination after Segment completes extracting data based on your model. You can choose from:
- Added records
- Updated records
- Added or updated records
- Deleted records
- Select a test record to preview the fields that you can map to your destination in the Add test record field.
- Select the Schedule type for the times you want the model’s data to be extracted from your warehouse. You can choose from:
- Interval: Extractions perform based on a selected time cycle.
- Day and time: Extractions perform at specific times on selected days of the week.
- Define how to map the record columns from your model to your destination in the Select Mappings section.
- You map the fields that come from your source to fields that the destination expects to find. Fields on the destination side depend on the type of action selected.
- If you’re setting up a destination action, depending on the destination, some mapping fields may require data to be in the form of an object or array. See the supported objects and arrays for mapping.
- (Optional) Send a test record to verify the mappings correctly send to your destination.
- Click Create Mapping.
- Select the destination you’d like to enable on the My Destinations page under Reverse ETL > Destinations.
- Turn the toggle on for the Mapping Status. Events that match the trigger condition in the mapping will be sent to the destination.
- If you disable the mapping state to the destination, events that match the trigger condition in the mapping won’t be sent to the destination.
To add multiple mappings from your warehouse to your destination, repeat steps 1-13 above.
Supported object and arrays
When you set up destination actions in Reverse ETL, depending on the destination, some mapping fields may require data as an object or array.
Object mapping
You can send data to a mapping field that requires object data. An example of object mapping is an Order completed model with a Products column that’s in object format.
Example:
    {
        "product": {
            "id": 0001,
            "color": "pink",
            "name": "tshirt",
            "revenue": 20,
            "inventory": 500
        }
    }
To send data to a mapping field that requires object data, you can choose between these two options:
| Option | Details |
|---|---|
| Customize object | This enables you to manually set up the mapping fields with any data from the model. If the model contains some object data, you can select properties within the object to set up the mappings as well. |
| Select object | This enables you to send all nested properties within an object. The model needs to provide data in the format of the object. |
Certain object mapping fields have a fixed list of properties they can accept. If the names of the nested properties in your object don’t match with the destination properties, the data won’t send. Segment recommends you to use Customize Object to ensure your mapping is successful.
Array mapping
To send data to a mapping field that requires array data, the model must provide data in the format of an array of objects. An example is an Order completed model with a Product purchased column that’s in an array format.
Example:
    [
    {
        "currency": "USD",
        "price": 40,
        "productName": "jacket",
        "purchaseTime": "2021-12-17 23:43:47.102",
        "quantity": 1
    },
    {
        "currency": "USD",
        "price": 5,
        "productName": "socks",
        "quantity": 2
    }
    ]
To send data to a mapping field that requires array data, you can choose between these two options:
| Option | Details |
|---|---|
| Customize array | This enables you to select the specific nested properties to send to the destination. |
| Select array | This enables you to send all nested properties within the array. |
Certain array mapping fields have a fixed list of properties they can accept. If the names of the nested properties in your array don’t match the destination properties, the data won’t send. Segment recommends you to use the Customize array option to ensure your mapping is successful.
Objects in an array don’t need to have the same properties. If a user selects a missing property in the input object for a mapping field, the output object will miss the property.
Null value management
You can choose to exclude null values from optional mapping fields in your syncs to some destinations. Excluding null values helps you maintain data integrity in your downstream destinations, as syncing a null value for an optional field may overwrite an existing value in your downstream tool.
For example, if you opt to sync null values with your destination and an end user fills out a form but chooses to leave an optional telephone number field blank, the existing telephone number you have on file in your destination could be overwritten with the null value. By opting out of null values for your downstream destination, you would preserve the existing telephone number in your destination.
By default, Segment syncs null values from mapped fields to your downstream destinations. Some destinations do not allow the syncing of null values, and will reject requests that contain them. Segment disables the option to opt out of syncing null values for these destinations.
To opt out of including null values in your downstream syncs: Navigate to Connections > Destinations and select the Reverse ETL tab. Select the destination and the mapping you want to edit. Click Edit mapping. Under the “Optional fields” header, select the field you want to edit. In the field dropdown selection, disable the Sync null values toggle.
Edit your mapping
To edit your mapping:
- Navigate to Connections > Destinations and select the Reverse ETL tab.
- Select the destination and the mapping you want to edit.
- Select the … three dots and click Edit mapping. If you want to delete your mapping, select Delete.
Using Reverse ETL
After you’ve set up your source, model, destination, and mappings for Reverse ETL, your data will extract and sync to your destination(s) right away if you chose an interval schedule. If you set your data to extract at a specific day and time, the extraction will take place then.
This page was last modified: 09 Sep 2024
Need support?
Questions? Problems? Need more info? Contact Segment Support for assistance!